
Why Choose a Basil Hydro Kit for Beginners?
If you have ever struggled to keep a supermarket basil plant alive for more than a week, you aren’t alone. Soil-based indoor gardening can be tricky; it requires a delicate balance of moisture, light, and nutrients that is easy to mess up. This is exactly where a basil hydro kit beginners setup shines.
The most striking benefit is the growth speed. Research shows that hydroponic herbs grow quicker and fuller than soil-grown plants. Because the roots are submerged in or misted with a nutrient-rich solution, the plant doesn’t have to “work” to find food. It can dedicate all its energy to leafy growth. This means you get to your first pesto-making session much faster.
Beyond speed, there is the factor of cleanliness. By planting herbs without soil, you eliminate the primary habitat for common indoor pests like fungus gnats. You also remove the mess of dirt on your kitchen counters. For those living in apartments or homes with limited outdoor space, these kits offer incredible space efficiency. You can grow a massive amount of basil in a footprint no larger than a mason jar.
Furthermore, these indoor gardening kits for beginners provide nutrient precision. Most kits come with pre-measured plant food, taking the guesswork out of fertilizing. You aren’t just hoping the soil has what the plant needs; you are ensuring it does. This leads to a consistent, year-round harvest that isn’t dependent on the quality of your backyard dirt or the current season.
Essential Components of a Basil Hydroponic Grow Kit
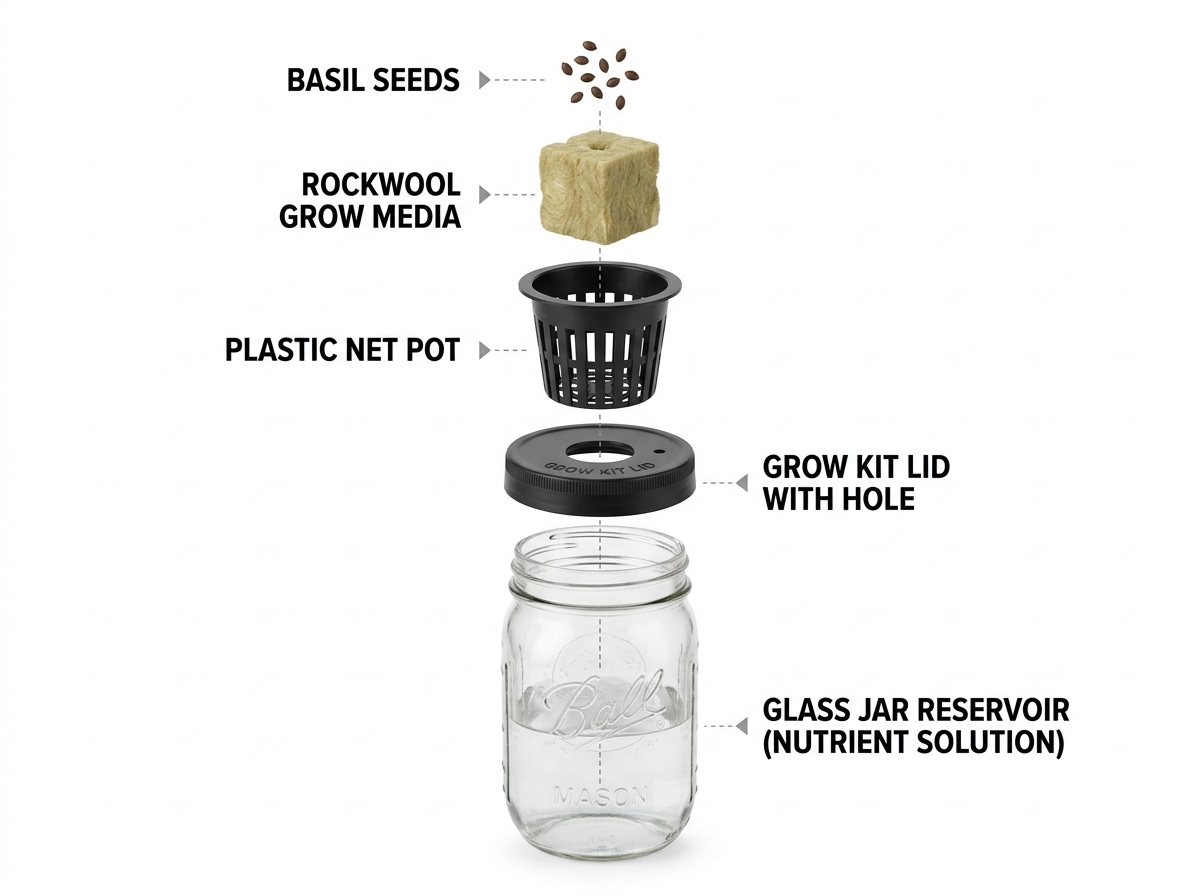
When you unbox a basil hydro kit beginners package, you might feel like you’re looking at a science experiment. Don’t worry—it’s simpler than it looks. Most beginner kits are designed for “set it and forget it” ease. Here is what you will typically find:
- The Water Reservoir: This is the container (often a glass jar or plastic tub) that holds the water and nutrient solution.
- Net Pots: These are plastic baskets with holes or slits. They hold the plant and the grow media while allowing the roots to grow out into the water.
- Grow Media: Instead of soil, kits use materials like coco coir, rockwool, or recycled glass pebbles. These provide support for the plant’s structure without the mess of dirt.
- Nutrient Solution: Usually a liquid or powder (often labeled “Part A” and “Part B”) that you mix into the water to provide essential minerals.
- Wicking System or Pump: Passive kits use a wick (a felt or cotton cord) to pull water up to the seeds. Active kits might use a small pump to circulate water.
- Basil Seeds: Most kits include high-germination seeds, often Genovese or Sweet Basil.
Understanding these parts is the first step in learning how to start an indoor herb garden. Some advanced beginner kits also include capillary mats—absorbent pads that help distribute moisture evenly—and specialized domes to maintain humidity during the delicate germination phase.
Selecting the Best Basil Varieties for Your Kit
Not all basil is created equal, especially when it comes to hydroponics. When using a basil hydro kit beginners setup, you want varieties that are productive and fit your culinary needs.
- Genovese Basil: The gold standard for pesto. It has large, curved leaves and a classic peppery-sweet flavor.
- Thai Basil: Identifiable by its purple stems and pointed leaves. It offers a licorice or anise-like flavor that is essential for Southeast Asian dishes.
- Lemon Basil: Adds a distinct citrus note to salads and fish. It’s a great way to add variety to your indoor garden.
- Compact/Bush Basil: If you are using a very small kit (like a mason jar), look for “Piccolo” or “Spicy Globe” varieties. They stay small and round, preventing them from taking over your windowsill.
Choosing easy herb seeds for beginners is vital. Look for heirloom seeds, which often have better flavor profiles and reliable germination rates. Most beginner kits guarantee a high “sprout rate,” so you aren’t left staring at a jar of water for weeks.
Ideal Environment for a Basil Hydro Kit for Beginners
To get the most out of your kit, you need to mimic basil’s favorite Mediterranean climate. It’s not just about the water; it’s about the “vibe” of the room.
- pH Levels: Basil is happiest when the water is slightly acidic, specifically in the 5.5 to 6.5 pH range. Most kits come with nutrients that help buffer the water to this level automatically.
- Temperature: Basil loves warmth. Aim for a room temperature between 70-80°F (21-27°C). If your house gets chilly at night, your basil might grow a bit slower.
- Lighting: This is the big one. Basil needs a lot of energy. It thrives on 14-16 hours of light per day. If you don’t have a very sunny south-facing window, you will likely need a small LED grow light.
- Nutrient Concentration (EC): For the tech-savvy, the Electrical Conductivity (EC) should be between 1.8-2.2 mS/cm. This ensures the water isn’t too “salty” for the roots but has enough food to fuel growth.
- Air Circulation: A little bit of airflow prevents mold and strengthens the stems. A nearby fan or an open window (in summer) works wonders.
Learning how to care for basil indoors involves monitoring these factors. If the leaves look pale, it might need more light; if they look scorched, the light might be too close!
Setting Up Your Basil Hydro Kit: A Step-by-Step Guide
Setting up your basil hydro kit beginners system is a bit like assembling flat-pack furniture—it’s intimidating for the first five minutes, and then it just clicks.
| Feature | Mason Jar Kit (Passive) | Grow Tent / LED Kit (Active) |
|---|---|---|
| Space Required | Minimal (Windowsill) | Moderate (Corner of a room) |
| Maintenance | Low (Refill water every 2 weeks) | Moderate (Check pump/pH weekly) |
| Light Source | Sun or small lamp | Integrated LED Grow Lights |
| Best For | Casual cooks, gifts | High-volume harvesting, hobbyists |
The Setup Process:
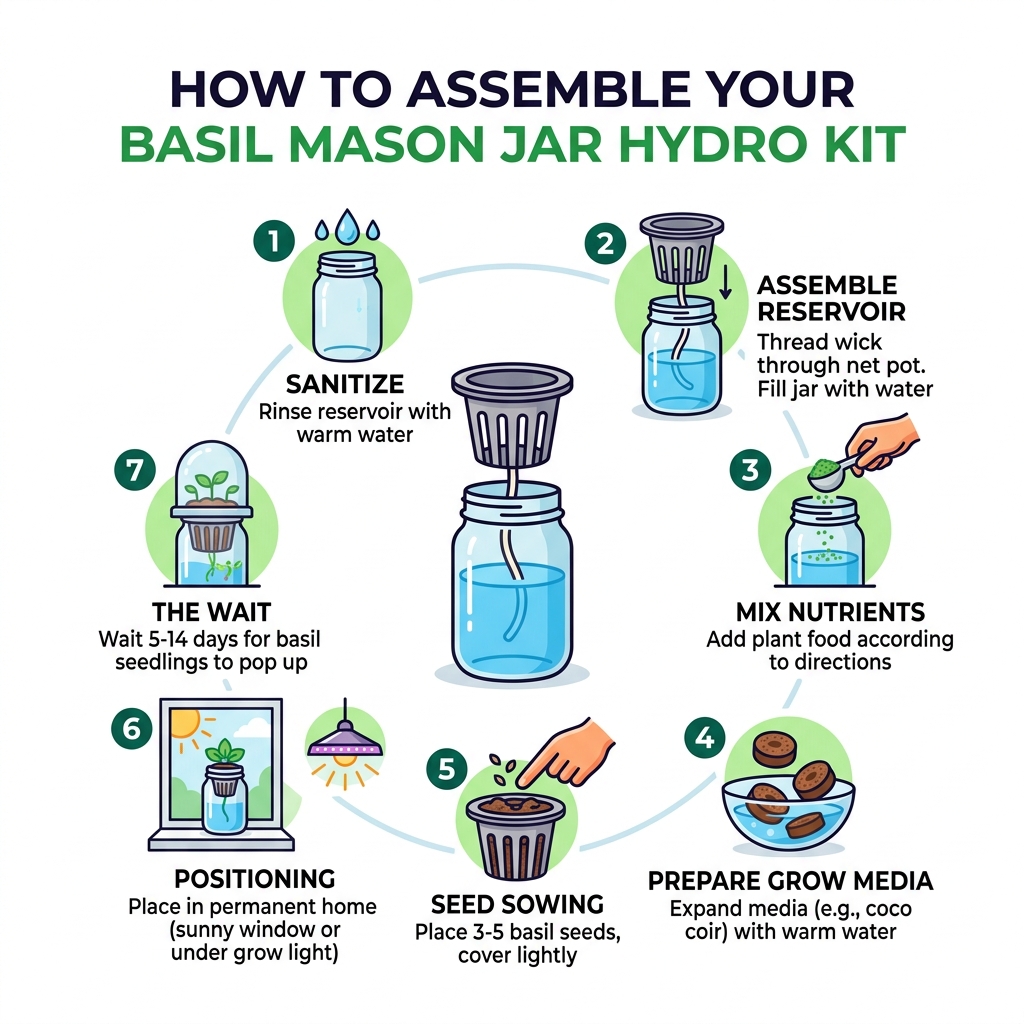
- Sanitize: Even though it’s new, give your reservoir a quick rinse with warm water.
- Assemble the Reservoir: If your kit uses a wick, thread it through the net pot. Fill the jar with water, leaving about an inch of space at the top.
- Mix Nutrients: Add the provided plant food according to the instructions. Don’t overdo it—more isn’t always better!
- Prepare the Grow Media: If using coco coir or Jiffy pellets, expand them with warm water first. They should be moist but not dripping.
- Seed Sowing: This is the fun part of starting herbs from seeds indoors. Place 3-5 seeds in the center of your grow media. Cover them very lightly—basil seeds need a tiny bit of light to germinate.
- Positioning: Place your kit in its permanent home. If using a grow tent, hang your LED lights about 24 inches above the top of the kit.
- The Wait: Cover with a humidity dome (if included) and wait 5-14 days for the first green “elbows” to pop up.
Troubleshooting Your Basil Hydro Kit for Beginners
Even with the best basil hydro kit beginners guide, nature sometimes throws a curveball. Here is how to handle the most common “oops” moments:
- Algae Growth: If you see green gunk in your water, light is getting into the reservoir. Wrap your jar in foil or heavy paper to block the light. Algae steals nutrients from your basil!
- Root Rot: If the roots look brown and slimy instead of white and fuzzy, they aren’t getting enough oxygen. Ensure the water level isn’t touching the base of the plant—the roots need an “air gap.”
- Leggy Stems: If your basil is tall, thin, and falling over, it’s “stretching” for light. Move it closer to the window or lower your grow light.
- Yellow Leaves: This is often a sign of a pH imbalance or nutrient deficiency. Check your water levels and ensure you are following the feeding schedule.
- White Fuzz on Soil: This is usually harmless “beneficial fungi,” but if it looks like a spider web, it might be mold. Improve air circulation.
Growing easy herbs for beginners to grow indoors is a learning process. Don’t be discouraged if your first plant isn’t perfect; basil is incredibly resilient and usually recovers quickly once you fix the environment.
Maintenance and Harvesting for Maximum Yield
Once your basil is established, maintenance is a breeze. Every two weeks, check the water level. Every month, you might want to completely refresh the water and nutrient mix to prevent “salt” buildup.
The Secret to Huge Basil: Pruning Many beginners are afraid to cut their plants. Don’t be! Pruning is the “give-and-take” of gardening—the more you pick, the more it grows. When your plant is about 6 inches tall and has three sets of leaves, pinch off the very top set just above a leaf node. This forces the plant to grow two new stems, making it bushy rather than tall and spindly. For more details, check out how to care for basil indoors 2.
Harvesting Tips:
- Morning is Best: Harvest your leaves in the morning when the essential oils are at their peak. This is when the flavor is most intense.
- Bottom to Top: Generally, harvest from the top to encourage growth, but don’t be afraid to take larger leaves from the bottom if you need a quick garnish.
- Never Take Too Much: Try not to harvest more than 1/3 of the plant at once. It needs those leaves to keep photosynthesizing!
If you find a variety you absolutely love, you can even use propagation techniques. Simply cut a healthy stem, put it in a glass of water, and once it grows roots, pop it into a new net pot in your kit. It’s one of the best herbs to grow indoors because it is so easy to multiply.
Frequently Asked Questions about Hydroponic Basil
How long does it take to harvest basil from a kit?
Patience is a virtue, but you won’t need much of it. Basil typically germinates in 7-14 days. You will see your first “true leaves” shortly after. Most basil hydro kit beginners setups are ready for a light harvest in 2 months and a full harvest in 3 months. Once established, a single kit can yield fresh leaves for 6 months or more if you keep pruning it!
Do I need special grow lights for indoor kits?
It depends on your home. Basil needs a minimum of 5 hours of direct sunlight or about 14-16 hours of bright, indirect light. If you have a south-facing windowsill that gets blasted with sun, you might be fine. However, for consistent year-round growth, a full-spectrum LED grow light is a game-changer. These lights mimic the sun’s spectrum and ensure your plant doesn’t get “leggy.” You can find more advice on how to care for basil indoors 3.
Can I reuse my hydroponic kit after the first harvest?
Absolutely! One of the best things about a basil hydro kit beginners investment is that it’s sustainable. Once your plant eventually reaches the end of its life (usually after 6-9 months), you can clean the system. Sterilize the reservoir and net pot with a weak bleach solution or vinegar, buy some new grow media and easy herb seeds for beginners-2, and start the cycle all over again.
Conclusion
Starting your journey with a basil hydro kit beginners setup is more than just a way to save money on groceries—it’s a step toward a more sustainable, flavorful lifestyle. There is a unique joy in plucking fresh, fragrant leaves off a plant you grew yourself to top a homemade pizza or whiz into a vibrant pesto.
Whether you choose a stylish mason jar for your windowsill or a high-tech grow tent for a massive yield, the results are the same: fresh culinary flavor at your fingertips, 365 days a year. Plus, these kits double as beautiful, biophilic home decor that brings a breath of life into any room.
At FinCapitaly, we believe that everyone should have access to the tools for a greener home. Ready to ditch the wilted supermarket herbs? Start your indoor garden today and experience the magic of soil-less growing!
