
Why Basil Microgreens Indoors Seeds Are Worth Growing Right Now
Basil microgreens indoors seeds are one of the fastest, easiest ways to grow fresh, flavored herbs at home — no garden, no outdoor space, no special experience needed.
Here’s the quick version for anyone ready to get started:
- Best seeds to buy: Genovese basil (classic Italian flavor), Ciao Bella Blend (90% Genovese + 10% Dark Opal), or Lemon Basil for a citrus twist
- How much seed you need: About 6.5 grams per standard tray
- Time to harvest: 16–25 days from sowing (germination in 5–10 days)
- Ideal temperature: 65–75°F (18–24°C)
- Where to grow: Indoors, year-round — a sunny windowsill or grow light works great
- Expected shelf life after harvest: 5–10 days
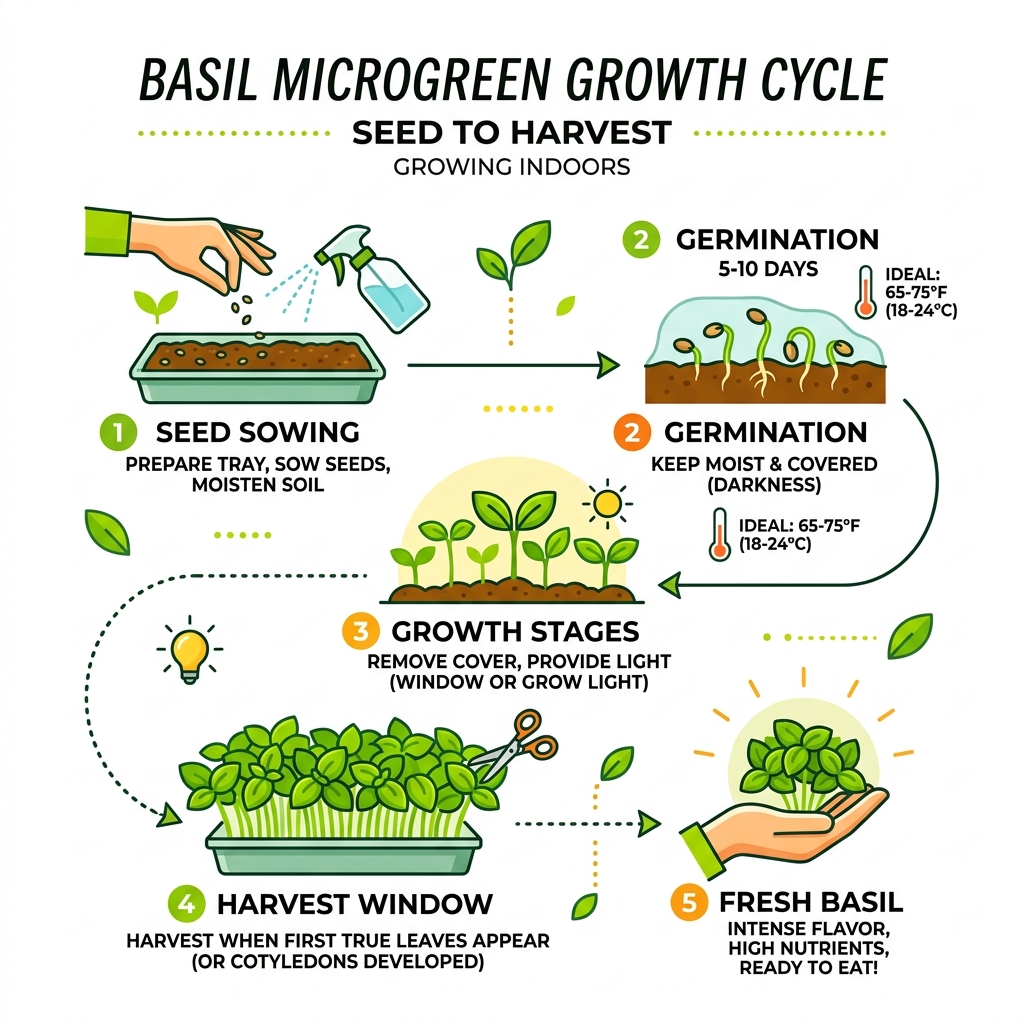
Basil microgreens are the seedling stage of the basil plant — harvested just after the first leaves (cotyledons) or first true leaves appear. They’re smaller than mature basil, but don’t let that fool you. Their flavor is concentrated and aromatic, and they pack up to 6x the nutrients of a fully grown basil plant.
For busy home cooks, they solve a real problem: fresh basil on demand, all year long, no matter the season or how little space you have.
The best part? You don’t need a fancy setup. A shallow tray, some good seeds, a warm spot, and regular misting is all it takes to go from seed to harvest in under a month.
Choosing the Best Basil Microgreens Indoors Seeds
When we start our indoor garden journey, the first and most critical step is selecting the right basil microgreens indoors seeds. Not all basil is created equal, especially when we are harvesting them at the “micro” stage. While a mature basil plant might take months to reach its full glory, microgreens are a sprint to the finish line.
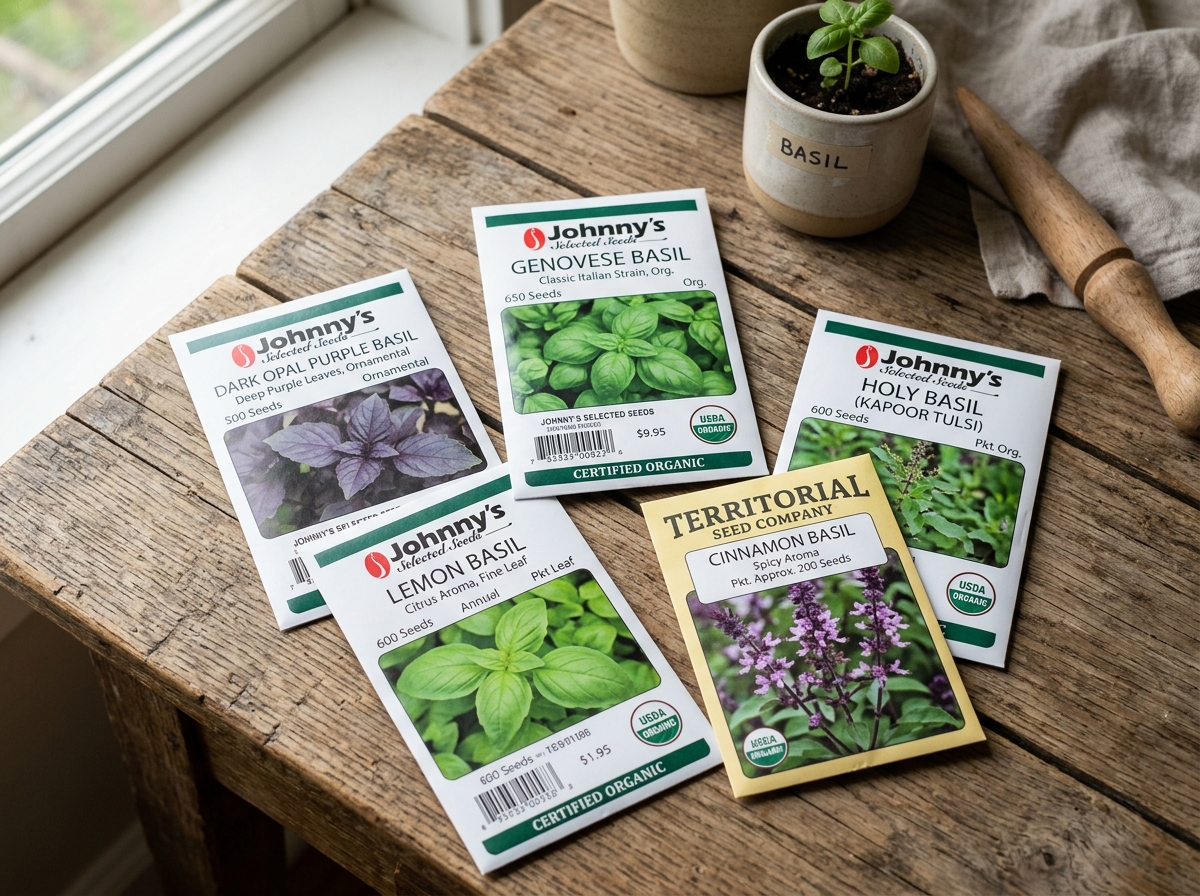
We recommend looking for seeds specifically labeled for microgreen use. These are often sold in larger quantities because microgreen growing requires a much higher seeding density than traditional gardening. If you buy a tiny packet meant for three plants in a backyard, you’ll run out before you’ve even covered the corner of your tray!
Here are the heavy hitters in basil microgreens:
- Genovese Basil: This is the gold standard. It offers that traditional, shiny green leaf and the punchy Italian flavor we all love. It is reliable, fast-growing, and perfect for beginners. You can find high-quality options like Basil, Genovese – Organic Microgreen Seed or the Basil, Genovese – Microgreen Seed from Johnny’s Selected Seeds.
- Dark Opal Basil: If you want to add a splash of deep purple to your dishes, this is the one. It’s slightly more variable in growth but provides a stunning visual contrast.
- Lemon Basil: For those who love a citrusy kick, Lemon Basil is a “superfood” favorite. It typically takes about 18 days to harvest and offers a unique aroma that pairs beautifully with fish or desserts.
- Red Rubin: This variety is famous for its consistent purple leaves and light-purple stems. It has a sweet-spicy flavor that is a staple in many Asian cuisines. Check out the Basil, Red Rubin – Organic Microgreen Seed for a professional-grade option.
[TABLE] Basil Microgreen Variety Comparison
| Variety | Flavor Profile | Leaf Color | Days to Maturity |
|---|---|---|---|
| Genovese | Classic Italian, Peppery | Bright Green | 16–25 Days |
| Dark Opal | Mild, Traditional Basil | Deep Purple/Burgundy | 20–25 Days |
| Lemon Basil | Intense Citrus, Tangy | Light Green | ~18 Days |
| Red Rubin | Sweet-Spicy, Robust | All Purple | 20–26 Days |
| Bicolor | Sweet and Spicy | Green & Purple | 16–25 Days |
Selecting High-Quality Basil Microgreens Indoors Seeds for Beginners
For those of us just starting out, we want a win right out of the gate. We suggest starting with a blend or a highly reliable organic seed. The Ciao Bella Basil Blend Microgreens Seeds from Botanical Interests is a fantastic choice because it mixes 90% Genovese with 10% Dark Opal. This gives you a mostly green tray with beautiful purple accents.
When purchasing, pay attention to the seeding density. A standard 10×20 inch tray usually requires about 6.5 grams of seed (which is roughly 5 flats per ounce of seed). If you are using smaller containers, you’ll need to adjust, but having about 4,800 seeds in a 6-gram packet is a good benchmark for a dense, lush carpet of greens.
We always advocate for easy-herb-seeds-for-beginners that have high germination rates. Look for “Non-GMO” and “Organic Certification” to ensure you are growing the cleanest food possible. If you are looking for a bulk source, Basil – Genovese – Microgreens Seeds from True Leaf Market is a reliable industry favorite.
Why Variety Matters for Your Basil Microgreens Indoors Seeds
Why settle for just green when you can have a rainbow? Variety isn’t just about aesthetics; it’s about flavor complexity. For example, the Basil, Bicolor – Organic Microgreen Seed is a showstopper. It consistently shows green cotyledons (the first leaves) and purple true leaves, creating a bicolor effect that looks incredible as a garnish.
Different varieties also have slightly different growth habits. Some grow taller, making them easier to harvest with scissors, while others stay low and dense. By experimenting with different basil microgreens indoors seeds, you can find the perfect match for your kitchen’s needs. If you’re interested in how these differ from growing standard basil, our guide on indoor-basil-growing dives deeper into the long-term care of the plant.
Essential Supplies for Your Indoor Micro-Garden
You don’t need a greenhouse to be successful. In fact, we’ve seen people grow amazing microgreens in recycled mushroom crates or fruit trays! However, if you want a consistent, professional-quality harvest, a few basic supplies will make your life much easier.
- Shallow Trays or Flats: You don’t need deep soil for microgreens because they are harvested so young. Shallow 10×20 trays are standard, but any container with drainage holes will work.
- Growing Medium: We recommend a high-quality potting mix or a soilless medium like coconut coir or peat moss. It should be fine-grained to allow those tiny basil roots to take hold easily. For more on the basics, check out starting-herbs-from-seeds-indoors.
- Grow Lights: While a sunny windowsill can work, basil loves light. If your kitchen is a bit dark, a simple LED grow light can prevent your microgreens from becoming “leggy” (tall, thin, and weak).
- Humidity Domes: These are clear plastic covers that sit over your trays during the germination phase. They lock in moisture, which is vital because basil seeds are mucilaginous (they develop a jelly-like coating when wet).
- Spray Bottle: A fine mist is essential for the first few days so you don’t wash the seeds away.
- Heat Mat (Optional): Basil is a tropical herb. If your house is chilly (below 65°F), a heat mat under the tray can speed up germination significantly.
Step-by-Step Guide to Growing Basil Microgreens
Ready to get your hands dirty? Growing basil microgreens indoors seeds is a therapeutic process that yields delicious results. Follow our proven steps for a successful crop.
1. Prepare the Tray
Fill your tray with about 1–2 inches of moist growing medium. Level it out so there are no large clumps or divots. You want a flat “bed” for your seeds.
2. Broadcast the Seeds
This is the “more is more” phase. Unlike traditional gardening where you space seeds inches apart, here we want them close. Aim for about 1/8 to 1/4 inch apart. If you’re using a standard tray, use that 6.5-gram measurement we mentioned earlier.
3. Press and Cover
Gently press the seeds into the soil with a flat board or your hand. This ensures “seed-to-soil contact,” which is the secret to high germination rates. For basil, you can cover them with a very thin layer of soil (about 1/4 inch) or vermiculite, though some growers prefer to leave them exposed and just use a humidity dome.
4. The “Blackout” Phase
Cover the tray with a humidity dome or another tray to keep it dark and moist. Basil seeds usually take 5–10 days to emerge. During this time, check them daily. If the soil looks dry, give it a light mist.
5. Let There Be Light
Once you see the sprouts pushing up, remove the cover and move them to a bright spot or under your grow lights. This is where the magic happens and they start turning that vibrant green (or purple!). For more detailed care tips, see our guide on how-to-care-for-basil-indoors-2.
Optimizing Conditions for Basil Microgreens Indoors Seeds
To get the most out of your basil microgreens indoors seeds, you need to mimic their favorite environment. Basil is a sun-lover and a heat-seeker.
- Temperature: The sweet spot is 65–75°F (18–24°C). If the soil temperature is around 75°F during germination, you’ll see much faster results. Once they’ve sprouted, you can drop the temp slightly to 60°F to keep them sturdy. If you’re struggling with room temperature, how-to-care-for-basil-indoors offers more climate control advice.
- Air Circulation: Because microgreens are planted so densely, they are prone to “damping off” (a fungal disease that makes them collapse). We recommend using a small horizontal airflow fan to keep the air moving. This keeps the stems dry and the plants healthy.
- Watering: Once the plants are established, stop misting from the top. Instead, use “bottom watering.” Pour water into the bottom tray and let the soil soak it up. This keeps the delicate leaves dry and prevents mold.
- Light Duration: Aim for 12–16 hours of light a day. If using a windowsill, rotate the tray 180 degrees every day so they don’t all lean in one direction.
Harvesting and Culinary Uses for Maximum Flavor
The moment of truth! After about 16–25 days (average 19 days for Genovese), your microgreens will be roughly 1/2 to 2 inches tall. You are looking for the “cotyledon” stage (the first set of heart-shaped leaves) or the appearance of the very first “true leaves.”
How to Harvest
Using sharp, clean scissors or a knife, snip the greens just above the soil line. Try to avoid getting any soil on the leaves, as microgreens are fragile and hard to wash without bruising. Only harvest what you need, or harvest the whole tray at once if they are reaching maturity.
Culinary Inspiration
The flavor of micro basil is much more intense than mature basil. You can use it as a direct substitute in any recipe, but because it’s so potent, a little goes a long way.
- Micro-Pesto: This is a game-changer. Use your microgreens to create an indoor-basil-the-star-ingredient-for-homemade-pesto that is smoother and more vibrant than traditional pesto.
- Garnishes: Sprinkle them over pizza, pasta, or Caprese salads.
- Cocktails: Red Rubin or Lemon Basil microgreens add a sophisticated twist to summery gins or mojitos.
- Desserts: Believe it or not, a few sprigs of purple basil on a lemon sorbet or strawberry tart is a five-star restaurant move.
For more ideas, check out a-beginners-guide-to-cooking-with-indoor-basil.
Storage Tips
Harvested microgreens have a shelf life of about 5–10 days. Store them in a sealed container in the refrigerator with a dry paper towel to absorb excess moisture. Do not wash them until right before you are ready to eat them!
Frequently Asked Questions about Basil Microgreens
How long does it take to grow basil microgreens?
Typically, it takes 16 to 25 days from the day you sow the seeds until they are ready for harvest. Germination usually happens within 5 to 10 days. The exact timing depends on the temperature and light—warmer rooms generally lead to faster growth. If you’re in a rush to make an indoor-basil-pesto-a-quick-and-easy-recipe, keep those trays warm!
Can I grow basil microgreens hydroponically?
Yes! Basil is considered a “Hydroponic Performer.” Many varieties, including Genovese and Bicolor, do excellently in Nutrient Film Technique (NFT) or Deep Water Culture (DWC) systems. You can use soilless mediums like hemp mats or specialized hydroponic pods. This method is often cleaner as there is no soil to wash off the delicate leaves.
What is the nutritional difference between microgreens and mature basil?
Microgreens are often called “superfoods” for a reason. Studies have shown they can contain up to 6x the nutrient concentration of their mature counterparts. They are particularly high in:
- Vitamin K: Essential for bone health and blood clotting.
- Vitamin C: A powerful antioxidant.
- Vitamin E: Great for skin and eye health.
- Beta-carotene: Which the body converts to Vitamin A.
Integrating these tiny greens into your diet is an easy way to boost your nutrient intake. Learn more about cooking-with-indoor-basil-a-simple-guide to see how easy it is to add these nutrients to every meal.
Conclusion
Growing your own basil microgreens indoors seeds is more than just a hobby—it’s a way to ensure your kitchen is always stocked with the freshest, most nutrient-dense herbs possible. By practicing succession planting (sowing a new tray every 7 to 14 days), you can enjoy a continuous, never-ending harvest.
Whether you’re looking to impress guests with a purple-hued garnish or simply want to boost your family’s health during the winter months, basil microgreens are the perfect solution. At FinCapitaly, we believe that everyone has a green thumb—it just takes the right seeds and a little bit of guidance.
Ready to start your own indoor oasis? Don’t wait for the sun to come out. Start your indoor garden today and experience the “more is more” flavor of home-grown micro basil!
