
Fresh Greens at Home: What You Need to Know About a Microgreens Indoor Herb Setup
A microgreens indoor herb setup lets you grow nutrient-dense greens and fresh herbs year-round — no garden, no experience, and no large space required. Here’s the quick version:
What you need to get started:
- Shallow trays (1-2 inches deep) with drainage holes
- Growing medium — potting soil, coconut coir, or hemp mats
- Seeds — radish, broccoli, or pea shoots are easiest for beginners
- Light source — a south-facing window or an LED grow light
- Spray bottle for watering
What to expect:
- Seeds germinate in 2-4 days
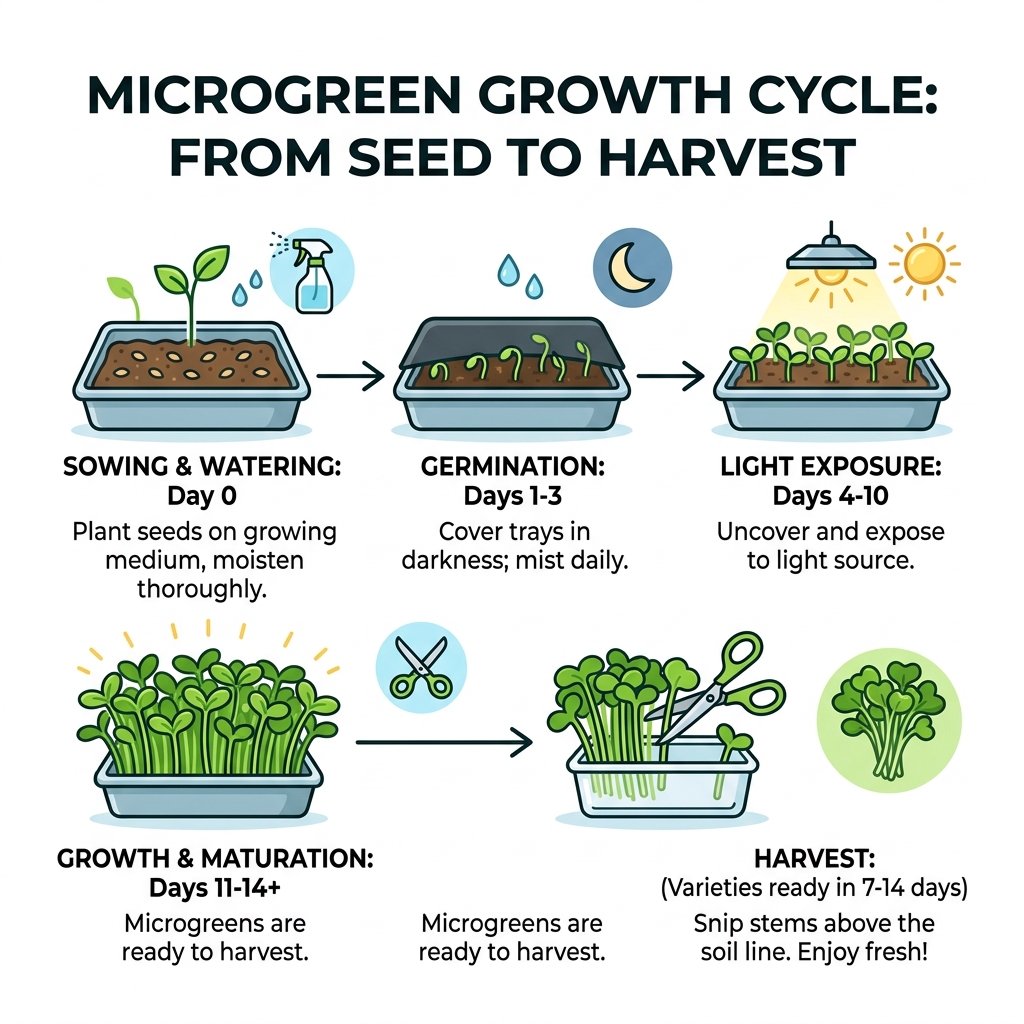
- Most varieties are ready to harvest in 7-14 days
- Daily care takes just 1-5 minutes
- A single tray costs $2-4 to grow vs. $5-10 at the store
Imagine paying $8 for a tiny clamshell of microgreens at the farmers market — then finding out you could grow the same amount at home for pennies. That’s the reality for most people before they discover how simple indoor growing can be.
The truth is, you don’t need a backyard, a green thumb, or expensive equipment. A space smaller than a kitchen table can produce enough fresh greens for daily salads all week long. And unlike most gardening projects, microgreens go from seed to plate in under two weeks — making them one of the most rewarding things a busy home cook can grow.
This guide walks you through everything: the right setup, the best varieties, and how to keep a steady supply of fresh herbs and greens on your counter all year.
Why Start a Microgreens Indoor Herb Setup?
Starting a microgreens indoor herb setup is essentially building your own miniature “superfood factory” right in your kitchen or spare closet. We often hear from people who feel intimidated by traditional gardening—the rototillers, the weeding, the battle against squirrels—but microgreens remove all those barriers.
The most compelling reason to start is the sheer nutrient density. Research, including studies from the University of Maryland, suggests that these tiny seedlings can contain 4 to 40 times the concentration of vitamins and antioxidants found in their mature counterparts. For instance, red cabbage microgreens have six times more Vitamin C than a full-grown head of cabbage.
Then there is the space efficiency. You don’t need an acre; you barely need a square foot. Whether you live in a sprawling farmhouse or a studio apartment, a vertical shelf or a windowsill is plenty of room. Because the “crop” is harvested when it is only 2-3 inches tall, you can stack trays on top of each other using simple shelving.
Finally, let’s talk about your wallet. If you’ve ever winced at the $5 to $10 price tag for a small plastic clamshell of organic greens at the grocery store, you’ll love the ROI here. We’ve found that growing your own costs between $0.30 and $0.80 per ounce, compared to the $4 to $8 per ounce charged at retail.
| Feature | Home-Grown Microgreens | Store-Bought Retail |
|---|---|---|
| Cost per Tray/Clamshell | $2.00 – $4.00 | $5.00 – $10.00 |
| Freshness | Harvested minutes before eating | Days or weeks old |
| Nutrient Content | Peak levels at harvest | Rapidly declining after cutting |
| Variety Choice | Dozens of unique flavors | Limited to 2-3 common types |
If you are wondering where to begin with the larger plants in your home, check out our guide on how to start an indoor herb garden to complement your microgreen trays.
Essential Equipment for Your Microgreens Indoor Herb Setup
You don’t need a lab-grade laboratory to succeed, but having the right “bones” for your microgreens indoor herb setup makes the process much smoother.
Growing Trays and Drainage
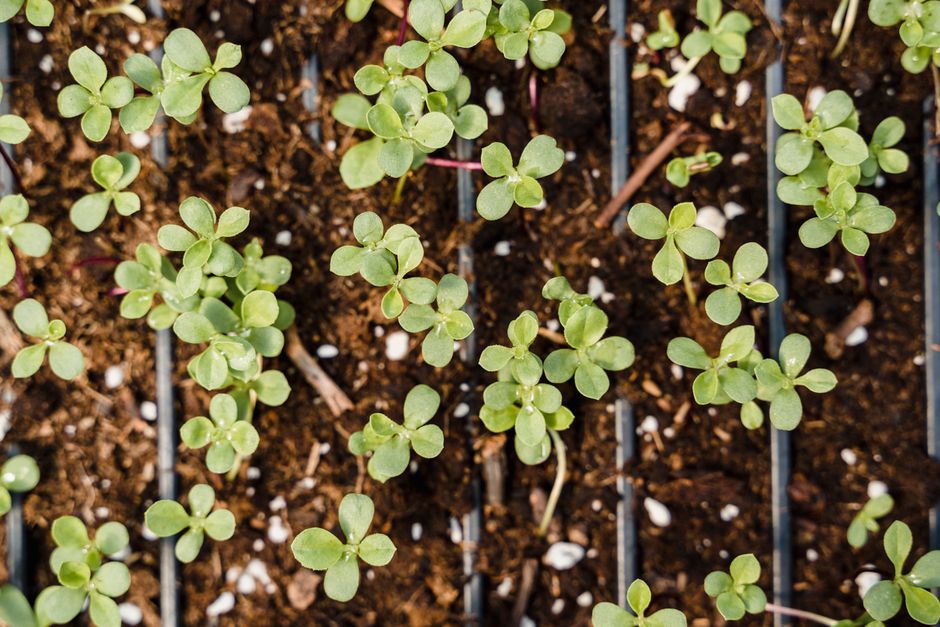
The industry standard is the “10×20” tray, but for beginners, any shallow container will do. You can upcycle plastic berry containers, take-out trays, or even stainless steel cookie sheets. The most important feature is drainage. You generally want a “nested” system: one tray with holes to hold the soil and seeds, and a solid tray underneath to catch excess water and allow for bottom-watering.
Growing Mediums
Choosing what your plants grow in is a matter of preference and cleanliness:
- Potting Soil: We recommend organic seed-starting mix. It’s forgiving and produces robust growth for larger seeds like sunflower or pea.
- Coconut Coir: A sustainable, soil-free option that holds moisture exceptionally well.
- Hemp Mats: These are incredibly clean and perfect for apartment dwellers who don’t want bags of dirt in the kitchen. They are a great local alternative to coconut coir in many regions.
For more details on keeping your plants fed, see our breakdown of soil and fertilizer for indoor herbs. If you’d rather have everything delivered in one box, we have reviewed several indoor gardening kits for beginners to help you skip the guesswork.
Choosing the Right Lighting for Your Microgreens Indoor Herb Setup
While a south-facing windowsill can work for a hobbyist, it often leads to “leggy” plants—those tall, skinny, pale stems that fall over because they are reaching for the sun. For a consistent, year-round harvest, artificial light is a game-changer.
You don’t need expensive “blurple” LED lights. Standard LED shop lights in the 5000K to 6500K (daylight) spectrum work beautifully. We typically set our lights on a timer for 14 to 18 hours a day. Position the lights close to the plants—usually just 6 to 12 inches above the canopy—to ensure they get enough Photosynthetic Photon Flux Density (PPFD) to grow thick and vibrant.
Learn more about choosing bulbs in our guide to grow lights for indoor herbs.
Best Varieties for a Beginner Microgreens Indoor Herb Setup
Not all seeds are created equal when you’re just starting out. Some take three weeks and are finicky about moisture, while others are nearly “set it and forget it.”
- Radish: The undisputed king for beginners. It germinates in 24 hours and can be harvested in as little as 6 days. It has a spicy, peppery kick.
- Broccoli: Mild in flavor but a nutritional powerhouse packed with sulforaphane. It’s ready in about 10 days.
- Pea Shoots: These are crunchy, sweet, and taste exactly like snap peas. Kids love them, and they are one of the few varieties that might give you a second harvest.
- Sunflower: These require a bit more work (soaking the seeds), but they produce a thick, nutty “green” that is substantial enough to be the base of a salad.
- Herbs (Basil, Cilantro, Chives): While these grow slower than radish (taking 14-21 days), they add incredible aromatics to your setup.
To get your seed collection started, check out our list of easy herb seeds for beginners and our tips for starting herbs from seeds indoors.
Step-by-Step Guide to Planting and Caring for Your Greens
Once you have your microgreens indoor herb setup ready, the actual planting process is a rhythmic, satisfying task.
1. Soil Preparation and Sowing
Fill your tray with about 1 to 1.5 inches of your chosen medium. Moisten it until it feels like a wrung-out sponge—damp, but not dripping. Broadcast your seeds evenly across the surface. For microgreens, we sow much more densely than we would in a garden. Think of it like “shaking sprinkles on a cupcake.” For small seeds like broccoli, use about a tablespoon for a 10×20 tray; for large seeds like peas, you might use nearly a cup.
2. The Blackout Period and Resistance Training
This is the “secret sauce” of professional growers. Cover your newly sown seeds with another tray (turned upside down) or a piece of cardboard to keep them in total darkness for 2 to 4 days.
Pro Tip: Place a small weight (like a brick or a heavy book) on top of the cover tray. This forces the tiny seedlings to push upward against the weight, which is like “resistance training” for plants. It results in thicker, stronger stems and helps the seedlings shed their seed hulls.
3. Introducing Light and Bottom Watering
Once the seedlings are about an inch tall and looking a bit pale (don’t worry, they’ll turn green almost instantly), remove the cover and turn on your lights.
From this point forward, avoid watering from the top. Spraying the leaves can lead to mold and “damping off” (where the stems rot at the soil line). Instead, pour water into the bottom tray and let the soil wick it up. This keeps the foliage dry and the roots happy. To avoid common pitfalls, read up on indoor herb watering mistakes to avoid and humidity tips for indoor herbs.
Harvesting, Storage, and Troubleshooting Common Issues
The best time to harvest is usually in the morning when the plants are at their most hydrated and crisp. You’ll know they are ready when the “cotyledons” (the first set of seed leaves) are fully expanded. Some people wait for the first “true leaves” to appear for extra flavor, but don’t wait too long, or the stems can become woody.
Use a pair of very sharp, clean scissors or a sharp chef’s knife to cut the greens about half an inch above the soil line.
Storage Secrets
Harvested microgreens can last 10 to 12 days in the fridge if handled correctly. The enemy is moisture. Place them in an airtight container or a glass jar with a dry paper towel to absorb any condensation. Do not wash them until right before you are ready to eat them.
Troubleshooting
If you see white, fuzzy stuff on your soil, don’t panic!
- Root Hairs vs. Mold: If the fuzz is only around the root and disappears when you mist it with water, those are harmless root hairs. If it’s a web-like structure that stays visible and smells musty, it’s mold.
- The Fix: Improve your airflow with a small fan on a timer. If mold persists, a diluted spray of 3% hydrogen peroxide (about 8ml per liter of water) can stop it in its tracks.
For those using smaller containers, we have advice on compact watering tools for herb gardens to help keep things tidy.
Frequently Asked Questions about Indoor Microgreens
Can microgreens regrow after cutting?
For the vast majority of varieties, the answer is no. Because we harvest them so young, they haven’t established the root energy reserves needed to bounce back from a “beheading.” They are a one-and-done crop. The exception is pea shoots; if you cut them just above the lowest leaf, they will often give you a second, slightly smaller harvest. For a continuous supply, we recommend “succession planting”—starting a new tray every 5 to 7 days.
Are microgreens more nutritious than mature plants?
Yes, significantly. Because you are eating the plant at its most energetic stage—when it’s using all the stored nutrients in the seed to explode into life—you get a concentrated dose of vitamins C, E, and K, as well as polyphenols and antioxidants. Broccoli microgreens, for example, are famous for their high levels of sulforaphane, a compound studied for its anti-cancer properties.
How do I prevent mold in my indoor setup?
Airflow is your best friend. An indoor environment can get stagnant, which mold loves. We suggest using a small oscillating fan on a timer to keep the air moving. Additionally, ensure your seeding density isn’t too high (which prevents air from reaching the soil) and always stick to bottom-watering. For more environmental control tips, see our humidity tips for indoor herbs 2.
Conclusion
At FinCapitaly, we believe that gardening should be accessible to everyone, regardless of the size of their home or the length of their “to-do” list. A microgreens indoor herb setup is the perfect entry point. It’s fast, it’s frugal, and it provides a level of freshness that no grocery store can match.
By staggering your plantings—sowing a new tray every week—you can ensure a continuous supply of vibrant greens that will transform your sandwiches, salads, and smoothies. It’s a small step toward sustainable living that pays off in every single bite.
Ready to expand your indoor jungle? Dive into our comprehensive guide on the Best Herbs to Grow Indoors to see what else you can add to your countertop garden. Happy growing!
