
Fresh Herbs at Your Fingertips: What a Culinary Herb Garden Starter Kit Can Do for You
A culinary herb garden starter kit is the easiest way to grow fresh basil, cilantro, parsley, and thyme right on your kitchen windowsill — no garden, no experience, and no green thumb required.
Here’s what you need to know at a glance:
- What it is: An all-in-one kit with herb seeds (or live plants), pots, soil, and instructions
- Who it’s for: Beginners, home cooks, apartment dwellers, and anyone short on space
- What you get: Fresh culinary herbs ready to harvest in as little as 10–14 days (live plant kits) or a few weeks (seed kits)
- Cost: Most kits range from roughly $15 to $100 depending on size and contents
- Top herbs included: Basil, cilantro, parsley, thyme, rosemary, oregano, and more
- Seed types: Most quality kits use non-GMO, heirloom, or USDA Organic seeds
Think about the last time you reached for a sad, wilted bunch of store-bought herbs. There’s a better way.
A good starter kit removes all the guesswork. You don’t need to source soil, hunt for the right pots, or figure out which seeds to buy. Everything arrives in one box, ready to go.
Whether you have a sunny south-facing window or just a small patch of counter space, these kits are designed to work in real kitchens — not just Pinterest photos.
Why Start with a Culinary Herb Garden Starter Kit?
Starting a garden from scratch can be intimidating. You have to choose the right soil, find pots with drainage, and hope the seeds you bought at the hardware store actually sprout. A culinary herb garden starter kit solves all of these problems at once by providing a curated, beginner-friendly environment for your plants.
One of the biggest draws of these kits is the quality of the seeds. Many premium kits feature heirloom varieties. Heirloom seeds are open-pollinated strains that have been passed down for generations, often 30 to 50 years or more, because of their superior flavor and reliability. Unlike hybrids, these seeds are stable and consistently produce the aromatic leaves we love in our cooking.
Furthermore, these kits commonly use non-GMO seeds. This means the plants haven’t been genetically engineered in a lab. For the health-conscious home cook, knowing exactly what goes into your soil, and eventually your body, is a major win. Some kits also carry the USDA Organic seal, indicating that no synthetic pesticides or fertilizers were used in seed production.
Beyond the health benefits, these kits are incredibly cost-effective. Consider this: a single plastic clamshell of organic basil at the grocery store can cost $4.00 and lasts only a few days before losing freshness. A $30 kit can provide you with repeated harvests over several months. It’s a sustainable choice that reduces plastic waste and can save money over time. For those just testing the waters, exploring easy herb seeds for beginners is a great way to understand which varieties offer the best value.
Essential Components of a High-Quality Kit
What exactly are you paying for when you buy a culinary herb garden starter kit? While every kit has its own style, the best ones include a specific set of must-haves to help you succeed.
The “Big Four” Herbs
Most kits focus on the heavy hitters of the culinary world:
- Basil (Genovese or Italian Large Leaf): The king of herbs for pesto and caprese.
- Cilantro (Slow Bolt): Essential for salsas and curries; look for “slow bolt” varieties that handle heat better without flowering too early.
- Parsley (Flat Leaf or Italian): Offers a much more robust flavor for cooking than the curly garnish variety.
- Thyme (English or Common): A hardy perennial that adds earthy depth to roasts and stews.
The Hardware
A high-quality kit isn’t just a bag of seeds. It should include:
- Potting Soil or Soil Discs: Many kits use concentrated coconut coir or peat discs that expand when you add water. These are sterile and often balanced for herb growing.
- Peat Pots or Burlap Bags: These are often compostable or breathable, which helps prevent root-bound plants and allows for easier transplanting.
- Bamboo or Wood Markers: Because when they are half an inch tall, cilantro and parsley can look almost identical.
- Herb Shears: Some premium kits include specialized shears to help you harvest without damaging the plant.
Seed-Based vs. Live Plant Kits: Which is Right for You?
When choosing your culinary herb garden starter kit, you’ll face a fork in the road: do you want to start from a tiny seed or buy pre-grown, rooted plants? Both have their advantages, but they serve different needs.
| Feature | Seed-Based Kits | Live Plant Kits |
|---|---|---|
| Cost | Generally $15-$40 | Generally $45-$100 |
| Harvest Time | 4-8 weeks | 10-14 days |
| Experience | Educational and rewarding | Instant gratification |
| Longevity | Plants are “yours” from birth | Higher risk of transplant shock |
| Variety | Huge selection of heirlooms | Limited to seasonal availability |
Seed-based kits are perfect for those who enjoy the magic of gardening. There is a deep sense of satisfaction in seeing a tiny green speck emerge from the soil. These kits are usually cheaper and often include a generous number of seeds across multiple packets. If you’re interested in the science of it, check out our guide on starting herbs from seeds indoors.
Live plant kits are for the cook who wants faster results. These kits arrive with fully rooted plants, and you can often start snipping leaves for dinner within two weeks. While more expensive, they take the uncertainty out of germination.
Setting Up Your Culinary Herb Garden Starter Kit
Setting up your kit should be a fun weekend project, not a chore. Most kits take about 30 minutes to assemble.
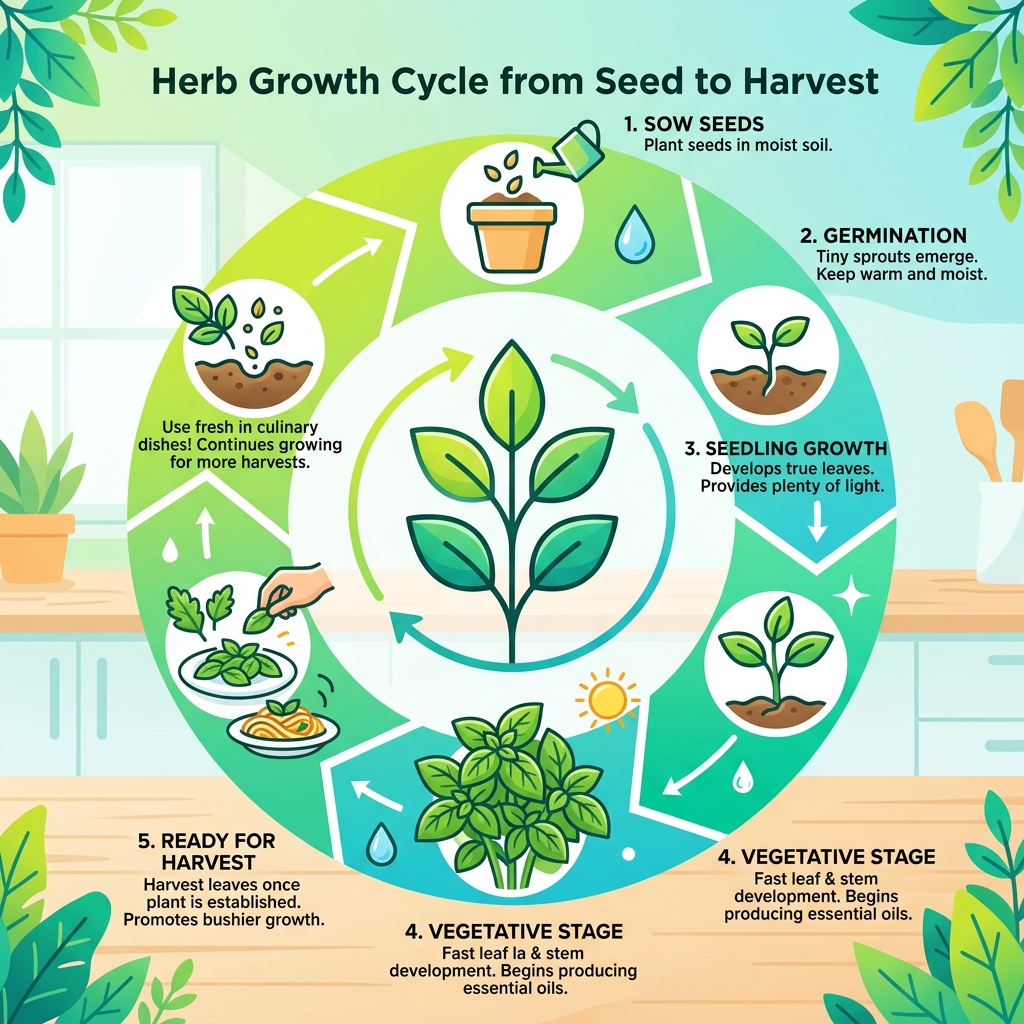
- Hydrate the Medium: If your kit came with soil discs, place them in a bowl and add warm water (usually about 2 cups per disc). Watch them grow like those “magic towels” from your childhood. Fluff the soil with a fork once it’s fully hydrated.
- Fill Your Pots: Pack the soil loosely into your pots or burlap bags. Don’t press too hard; herb roots need “breathing room” (oxygen) to thrive.
- Sow the Seeds: A common mistake is burying seeds too deep. Most herb seeds only need to be covered by about 1/4 inch of soil. Some, like oregano, are so small they barely need any covering at all.
- Label Immediately: Use your bamboo markers right away. Trust us on this one.
For a deeper dive into the nuances of moisture and container choice, see our article on how to start an indoor herb garden.
Preparing Your Culinary Herb Garden Starter Kit Indoors
Location is everything. For an indoor garden, your windowsill is your “prime real estate.”
- Sunlight: Most culinary herbs need 4–6 hours of direct sunlight. A south-facing window is the gold standard. If you only have north-facing windows, you might need a small LED grow light to supplement.
- Temperature: Herbs like the same temperatures humans do—between 65°F and 75°F. Keep them away from cold drafts or the intense heat of a radiator.
- Air Circulation: Plants need to breathe. If your pots are packed too tightly together, they can develop mold or fungus. Give them an inch or two of “personal space.”
Choosing the right plants for your kitchen environment is key. You can learn more about the best indoor herbs for cooking to see which ones will thrive in your specific light levels.
Transitioning Your Culinary Herb Garden Starter Kit to Patios
If your windowsill gets too crowded, many kits are designed to move outdoors. However, you can’t just toss them onto the patio and hope for the best.
- Acclimation (Hardening Off): Your plants are used to the cozy, windless environment of your kitchen. To move them outside, place them in a shaded, protected spot for a few hours a day, gradually increasing their exposure to sun and wind over a week.
- Hardiness Zones: Check your local USDA hardiness zone. Most herbs are fine outdoors in the summer, but rosemary and thyme are the only ones likely to survive a frost.
- Watering Changes: Soil dries out much faster outdoors. You may find yourself watering daily on a hot patio compared to twice a week in the kitchen.
For more inspiration on outdoor setups, explore these beginner-friendly herb garden ideas
Maintenance and Harvesting Tips for Success
The secret to a long-lasting culinary herb garden starter kit is consistent care. It’s not about spending hours a day; it’s about spending two minutes every other day.
Watering: The “finger test” is your best friend. Stick your finger an inch into the soil. If it feels dry, water it. If it feels damp, leave it alone. Overwatering is the #1 killer of indoor herbs. Feeding: After about a month, the nutrients in your starter soil will be depleted. Use a half-strength liquid organic fertilizer (sometimes called “herb serum”) once every two weeks to keep the leaves vibrant and flavorful. Harvesting: This is the part people get wrong—they are too afraid to cut their plants! For most herbs, the more you harvest, the more they grow.
- Basil: Always snip from the top, just above a set of leaves. This encourages the plant to “bush out” rather than growing into a tall, skinny stick.
- Cilantro and Parsley: Cut the outermost stems first, leaving the new growth in the center to continue developing.
- The 1/3 Rule: Never harvest more than one-third of the plant at a time. It needs those remaining leaves to photosynthesize and grow back.
For those who want a “set it and forget it” approach, we have more tips on low-maintenance indoor herb planting.
Frequently Asked Questions about Culinary Herb Garden Starter Kits
How long does it take to harvest from a culinary herb garden starter kit?
If you use a live plant kit (like Bonnie Plants), you can often harvest within 10–14 days. For seed-based kits, expect to wait 4–6 weeks for fast growers like basil and cilantro, and up to 8–12 weeks for slower plants like rosemary or parsley.
Do I need special lighting for an indoor herb garden?
If your kitchen gets at least 6 hours of bright, direct sunlight, you likely don’t need extra lights. However, during winter months or in dark apartments, a simple LED grow light can prevent your herbs from becoming “leggy” (tall, weak, and pale).
Are heirloom seeds better than hybrid seeds for cooking?
“Better” is subjective, but for flavor, heirlooms usually win. They have been selected over decades specifically for their taste and aroma, whereas many modern hybrids are bred for “shippability” and shelf life in grocery stores. Heirlooms are also always non-GMO, which is a priority for many home cooks.
Conclusion
At FinCapitaly, we believe that the best way to improve your cooking—and your quality of life—is to bring a little bit of nature into your home. A culinary herb garden starter kit is more than just a box of dirt and seeds; it’s an invitation to experiment with new flavors, reduce your environmental footprint, and enjoy the simple therapy of watching something grow.
These kits make incredible gifts for housewarmings, aspiring chefs, or even as a fun educational project for kids. There is nothing quite like the aroma of fresh-picked basil hitting a warm pan of pasta sauce to make a house feel like a home.
Ready to stop buying those plastic grocery store packets and start your own flavor factory? Start your garden journey today and transform your windowsill into a lush, edible oasis.
