
Why the Basil Seed Harvesting Process Is Worth Mastering
The basil seed harvesting process for Ocimum basilicum is simpler than most gardeners expect — and it can give you a free, renewable supply of fresh basil every single year.
Here’s a quick overview of how it works:
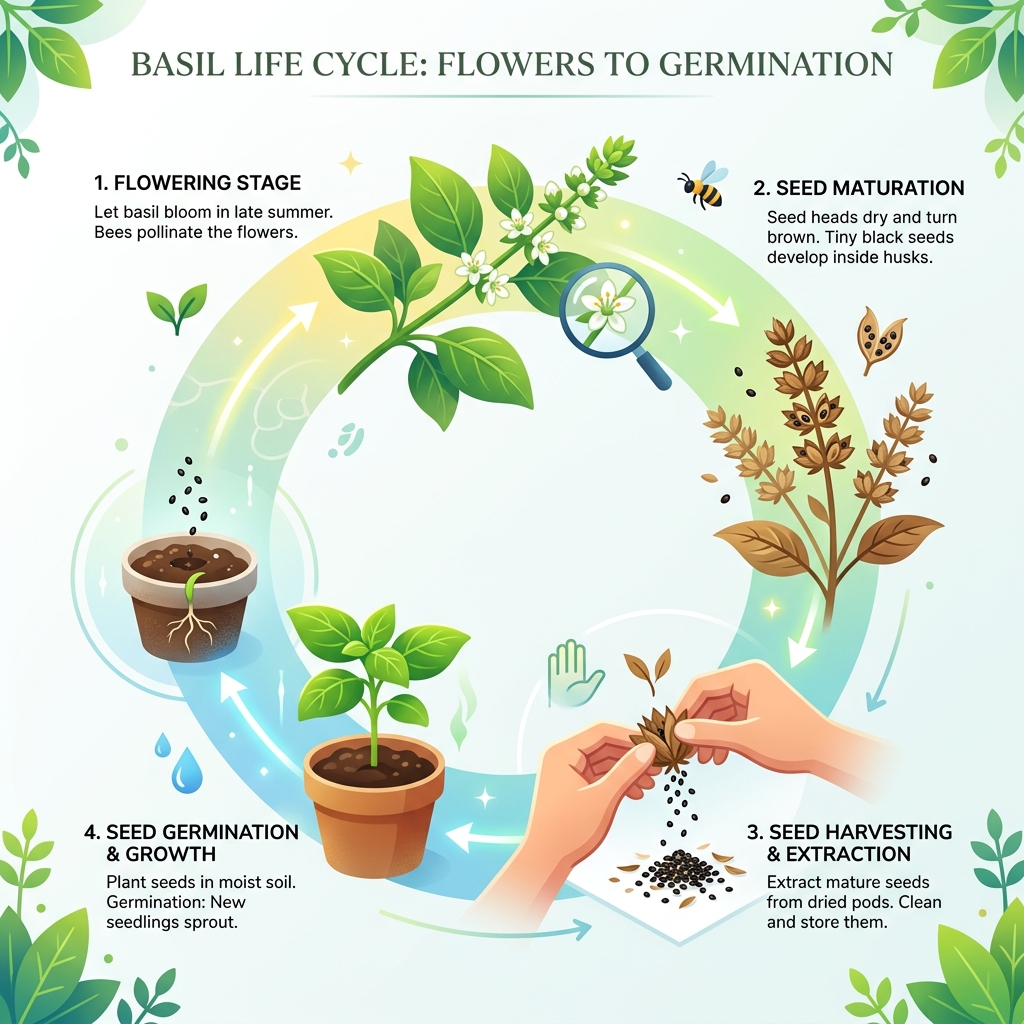
- Let your basil flower — Stop pinching stem tips in late summer and allow blooms to form.
- Wait for seed heads to dry — Look for brown, papery, crunchy husks with black seeds inside.
- Cut the flower spikes — Snip stems cleanly with pruners or sharp scissors.
- Dry in a paper bag — Place spikes upside-down in a breathable paper bag for 1 to 4 weeks.
- Extract the seeds — Rub dried flowers between your fingers or shake the bag to release seeds.
- Separate seeds from chaff — Blow gently across seeds on white paper, or use a fine mesh sieve.
- Store properly — Keep dried seeds in a sealed container in a cool, dark place.
That’s the whole process. A single basil plant can produce hundreds of seeds, and those seeds can stay viable for up to five years with the right storage.
Many home gardeners only discover this by accident. You get busy, forget to pinch the flowers, and suddenly your basil plant is covered in tall, blooming spikes — and the bees are thrilled. That “mistake” turns out to be one of the best things that can happen in your herb garden.
Whether you’re tight on space, growing indoors, or just tired of paying for fresh herbs at the store, learning this process puts you in control of your basil supply from season to season.
Timing Your basil seed harvesting process
Success in the basil seed harvesting process begins with a shift in mindset. For most of the summer, we are taught to pinch off every flower bud we see to keep the leaves tender and flavorful. However, to save seeds, we must eventually let the plant fulfill its natural destiny: bolting.
The best time to stop pruning and let your basil flower is typically mid-to-late summer, roughly 8 to 16 weeks after planting. This gives the plant enough warm weather to develop mature, viable seeds before the first frost hits. Since basil is a frost-tender annual, it will die back once temperatures drop, so timing is critical. We recommend choosing your healthiest, most robust plants to “go to seed” while continuing to harvest leaves from others.
When the plant bolts, it sends up tall flower spikes. These spikes will first produce small white or light purple flowers that attract pollinators like bees. Once these flowers fade, the real work of seed maturation begins. For a deep dive into maintaining your plants during this transition, check out our guide for the herb obsessed.
Identifying Ripe Basil Seed Pods
Knowing exactly when to harvest is the difference between a successful sprout next spring and a handful of duds. You cannot harvest basil seeds while the pods are still green and succulent.
Look for these three indicators of ripeness:
- Color: The flower husks and stems should turn from green to a light tan or dark brown.
- Texture: The pods should feel papery, dry, and “crunchy” to the touch.
- Seed Appearance: If you peek inside a dried pod, you should see tiny, hard, jet-black seeds.
If the seeds are still white or brown, they aren’t ready. Mature basil seeds are about the size of a sesame seed and look remarkably like chia seeds. If you are growing your herbs in a controlled environment, you can learn more about how to care for basil indoors to ensure your indoor plants reach this stage successfully.

Step-by-Step Guide to Seed Saving
Once your flower spikes are brown and crispy, it is time to bring them in. The basil seed harvesting process requires very few tools: a pair of clean pruners or scissors, some paper bags, and a bit of patience.
- Snipping: Cut the flower stalks about two inches below the lowest dried seed head.
- Bagging: Place the stalks head-down into a paper bag. Paper is essential here because it “breathes,” unlike plastic which can trap moisture and cause mold.
- Drying: Hang the bag or place it in a warm, well-ventilated area away from direct sunlight. This drying period can take anywhere from one to four weeks depending on your local humidity.
- Extraction: Once fully dry, you can shake the bag vigorously or rub the flower heads between your palms over a large bowl to release the seeds.
For those just starting out, we have a helpful resource on starting herbs from seeds indoors to help you plan your next crop.
Executing the basil seed harvesting process
Extracting seeds from the tiny pods can be a bit tedious, but it is incredibly rewarding. Each little dried flower petal actually contains a seed pod, and each pod typically holds four tiny black seeds.
| Method | Best For | Pros | Cons |
|---|---|---|---|
| Manual Rubbing | Small batches | No special tools needed; very gentle on seeds. | Can be slow; hard on the fingers after a while. |
| Mesh Sieve | Large harvests | Fast; separates large chunks of plant material instantly. | Requires a specific sieve size; can be messy. |
If you have a large amount of basil, we suggest using a fine mesh strainer. By rubbing the dried pods against the mesh, the seeds will fall through while the larger “chaff” (dried leaves and stems) stays behind. This is a great tip for those looking for easy herb seeds for beginners.
Cleaning and Separating the Chaff
“Chaff” is the gardening term for the leftover dried bits of flowers and stems that aren’t seeds. While planting a bit of chaff won’t hurt anything, cleaning your seeds makes them easier to store and prevents mold.
The “White Paper Method” is our favorite trick:
- Pour your seed and chaff mixture onto a large sheet of white paper or a rimmed baking sheet.
- The black seeds will stand out clearly against the white background.
- Gently blow across the pile. Because the chaff is lighter than the seeds, it will drift away, leaving the heavy black seeds behind.
- Alternatively, use a fine sieve to shake out the dust.
For more beginner-friendly advice on handling your harvest, see our secondary guide on easy herb seeds for beginners.
Essential Tools and Storage for Long-Term Viability
Proper storage is the final, most crucial step of the basil seed harvesting process. If you store your seeds while they still have a hint of moisture, they will rot or mold before spring arrives.
We recommend using airtight containers such as small glass jars, pill bottles, or even upcycled spice containers. To ensure maximum dryness, many gardeners add a small packet of silica gel or a few grains of rice wrapped in tissue to act as a desiccant. Always store your seeds in a dark environment, as light can degrade their quality over time. For more on maintaining the environment for your herb projects, read about caring for basil indoors.
Maximizing the Success of Your basil seed harvesting process
Did you know that properly stored basil seeds can remain viable for up to five years? While their germination rate (the percentage of seeds that actually sprout) will drop slightly each year, they are remarkably hardy.
To maximize longevity, keep these tips in mind:
- Temperature: Aim for a cool storage spot, ideally below 40°F (4°C). Many experts actually store their seeds in the refrigerator.
- Pest Control: To eliminate any tiny hitchhiking pests, you can freeze your harvested seeds for 2 to 4 days before moving them to long-term storage.
- Labeling: This is the step everyone forgets! Label your container with the variety (e.g., Genovese, Thai, Lemon) and the date of harvest. Trust us, all basil seeds look identical once they are in the jar.
For continued success with your herb garden, explore our additional tips on indoor basil care.
Advanced Tips: Hybrids and Cross-Pollination
As you become more comfortable with the basil seed harvesting process, you might start wondering why your “Purple Basil” seeds grew into plants that are half-green and half-purple. This is due to cross-pollination.
Basil is generally self-pollinating, meaning a single plant can produce fertile seeds on its own. However, if you have different varieties—like Thai basil and Genovese—growing near each other, bees will happily move pollen between them. This creates “hybrid” seeds.
If you want to keep your varieties “pure” (growing “true to type”):
- Isolation: Plant different varieties at least 150 feet apart.
- Hand-Pollination: Use a small paintbrush to move pollen within the flowers of a single plant and then cover the flowers with a fine mesh bag to keep insects out.
- Heirloom vs. Hybrid: Only save seeds from “heirloom” or “open-pollinated” varieties. Seeds saved from “F1 Hybrid” plants (common in grocery stores) often produce plants that look nothing like the parent.
To learn more about managing different varieties in a confined space, check out our guide on indoor basil growing.
Frequently Asked Questions about Basil Seeds
Can I harvest seeds from green pods?
We strongly advise against this. Green carpels contain immature seeds that have not yet developed the hard outer shell needed for dormancy. If you harvest them too early, they will likely shrivel up and fail to germinate. If frost is imminent and your pods are still green, cut the entire stem and bring it indoors to dry in a vase of water or a paper bag; this sometimes allows the seeds to finish ripening using the energy left in the stalk.
How many seeds does one basil plant produce?
A single healthy basil plant can produce hundreds, if not thousands, of seeds. Since each tiny flower pod contains four seeds and a single spike can have dozens of flowers, the growth is exponential. This allows you to build a massive “seed bank” very quickly, ensuring you have plenty to share with friends and neighbors.
Will saved seeds from store-bought basil grow true?
It is a bit of a genetic lottery. Most basil sold in grocery stores is a hybrid variety bred for specific shipping traits. While the seeds will likely grow, the resulting plant might have different leaf shapes, a different aroma, or less vigor than the original. However, for a home gardener, this can be a fun experiment!
Conclusion
Mastering the basil seed harvesting process is more than just a way to save a few dollars at the garden center; it is a way to connect with the full seasonal cycle of your garden. By allowing your plants to flower and finish their life cycle, you are participating in a sustainable tradition that has been passed down for generations.
At FinCapitaly, we believe that self-sufficiency starts in the kitchen garden. Whether you are growing on a windowsill or in a backyard plot, saving your own seeds ensures that your favorite flavors are always within reach. Master the art of indoor basil growing with our comprehensive guide and start your journey toward a perpetual harvest today!
