
Why Self Watering Herbs Are a Game-Changer for Home Cooks
Self watering herbs are plants grown in containers that automatically deliver moisture to roots from a built-in water reservoir — no daily watering needed.
Here’s a quick overview of how they work:
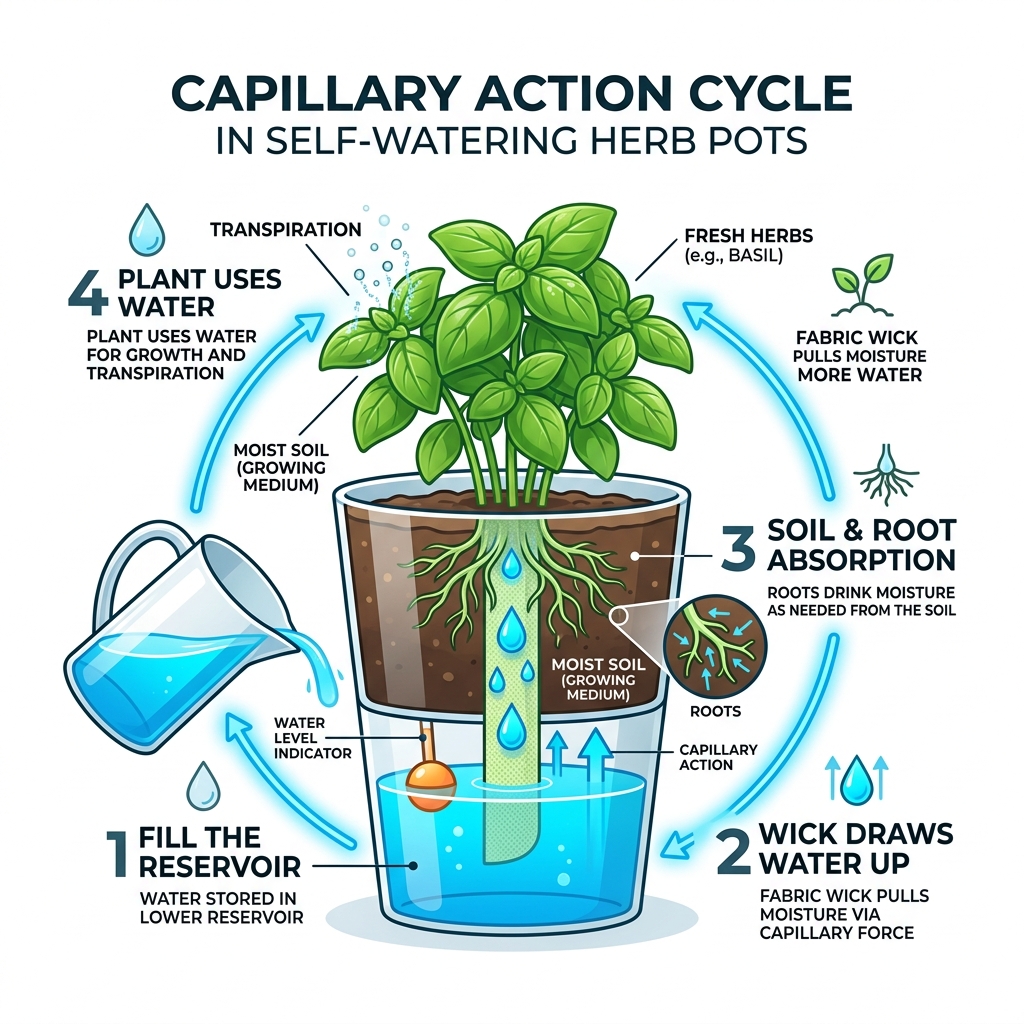
- Fill the reservoir — a water tank sits below or beside the soil
- A wick draws water up — cotton or fabric pulls moisture into the root zone via capillary action
- Plants drink what they need — roots absorb only as much as they require
- Monitor the water level — refill when the indicator shows low (typically every 1-2 weeks)
- Harvest fresh herbs — basil, mint, parsley, cilantro, and more grow consistently well
If you love fresh herbs but keep killing them — you’re not alone. Most indoor herbs die from inconsistent watering, not neglect. Overwater once, underwater the next day, and even the toughest basil gives up.
Self-watering systems take that guesswork away completely. Whether you’re using a $5 DIY bottle planter or a commercial unit, the core idea is the same: set it, forget it, and snip herbs whenever you need them.
This guide covers everything — from building your own planter with recycled bottles to choosing the right herbs and keeping your system running smoothly.
Understanding the Mechanics of Self Watering Herbs
At its heart, a self-watering system is a lesson in physics. We often think of plants as passive drinkers, but they are actually quite active in managing their hydration. By using a reservoir system, we provide a constant source of “on-demand” water.
The secret sauce is capillary action. This is the same process that happens when you dip the corner of a paper towel into a spill and watch the liquid climb upward. In our herb pots, a wick (usually made of cotton, microfiber, or even specialized felt) sits with one end in the water and the other in the soil. As the plant transpires and the soil dries out, the wick pulls moisture up to maintain a perfect balance. If you want a simple science-based overview of the process, the concept is well explained in capillary action.
This method offers several biological advantages:
- Oxygen-Rich Water: Because the water is drawn up from below, the top layers of soil remain loose and airy. This prevents the “compaction” that happens when you pour heavy water over the top, ensuring roots get the oxygen they need to thrive.
- Root Health: In traditional pots, roots often huddle at the bottom looking for moisture or get “drowned” during heavy watering. In a self-watering setup, roots grow toward the moisture source, creating a robust, healthy network.
- Evaporation Reduction: Since the water reservoir is usually covered or enclosed, very little water is lost to the air. This makes it an incredibly efficient way to grow self watering herbs in dry indoor environments.
- Non-Electric Designs: While some high-end systems use pumps, most home setups are purely mechanical. They rely on gravity and physics, meaning no cords, no noise, and no electricity bill.
Setting up your first system doesn’t have to be complicated. If you’re looking for the right foundation, check out these indoor-herb-garden-setup-tips to get started on the right foot.
Step-by-Step Guide to Building a DIY Planter
You don’t need a high-tech lab to grow self watering herbs. In fact, some of the most effective systems are born in the recycling bin. Using upcycled materials is not only eco-friendly but also a great “trial run” to see which herbs like your kitchen’s light levels.
Selecting the Best Self Watering Herbs for Beginners
Before you start cutting bottles, you need to choose your “residents.” Not all herbs are created equal when it comes to their thirst. We recommend starting with moisture-loving plants that don’t mind having “wet feet” occasionally.
- Basil: The king of the kitchen garden. Basil loves consistent moisture and warmth. It typically germinates in 7–14 days.
- Mint: Nearly impossible to kill and loves water. It’s perfect for a wick system because it grows aggressively.
- Parsley and Cilantro: These leafy greens prefer staying hydrated to prevent “bolting” (going to seed too early).
- Lemon Balm: A hardy member of the mint family that thrives in self-watering setups.
When your seeds sprout, remember to thin the seedlings. If you have five plants fighting for the same wick, none of them will reach their full potential.
Assembling Your Recycled Bottle System
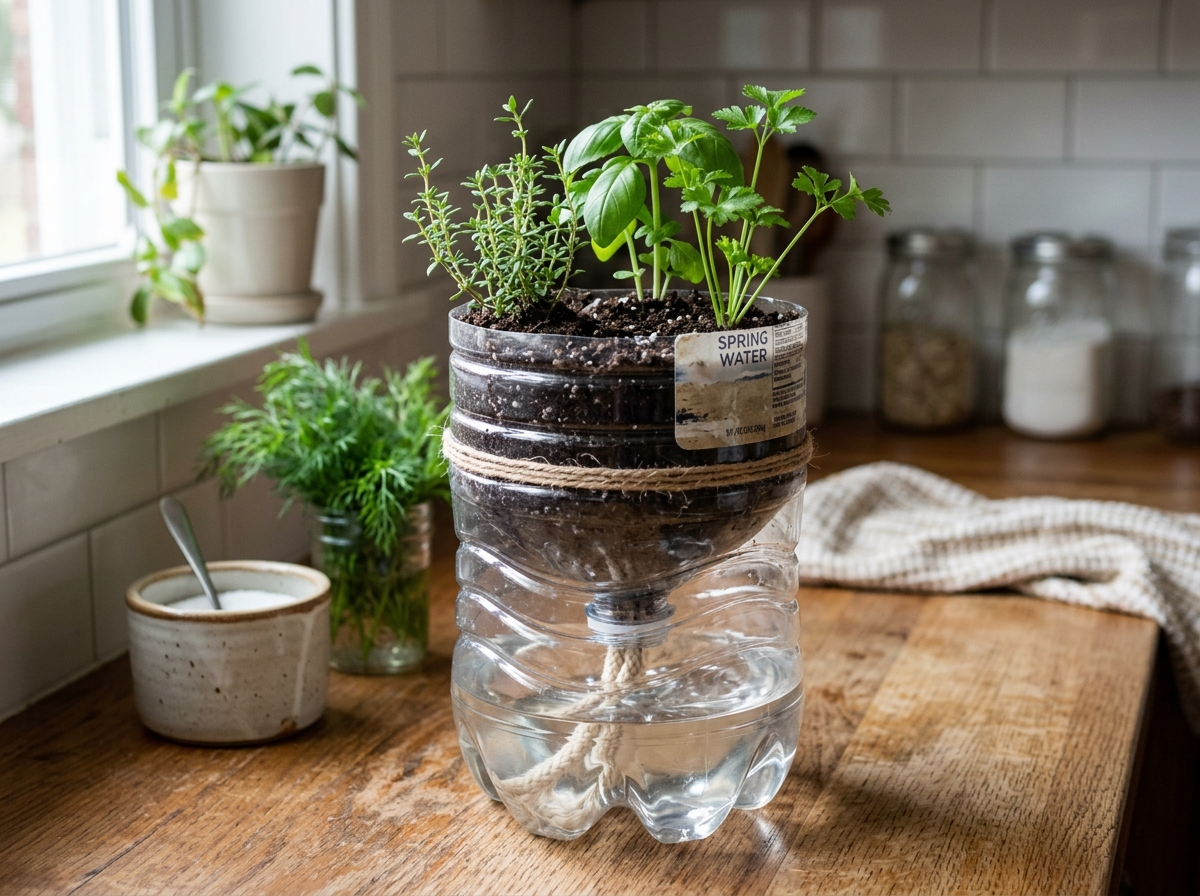
Ready to build? Here is our foolproof method using a standard 2-liter soda bottle.
- Prep the Bottle: Drink the soda (or pour it out), rinse the bottle thoroughly, and peel off the label.
- The Cut: Use a utility knife to start a cut about halfway up the bottle, then finish it with scissors. You’ll end up with a funnel-shaped top and a cup-shaped bottom.
- The Cap: Drill a 1/4-inch hole in the center of the bottle cap.
- The Wick: Use 3 to 4 strands of 100% cotton twine or a strip cut from an old cotton T-shirt. Tie a knot about two inches from one end.
- Assembly: Thread the wick through the cap so the knot sits on the inside. Screw the cap back onto the bottle top and place it upside down into the bottom half.
- Soil and Water: Fill the top half with a high-quality soil-and-fertilizer-for-indoor-herbs. Ensure the wick is buried in the center of the soil. Fill the bottom reservoir with water until it reaches the cap.
Pro Tip: For the very first time, water the soil from the top to “prime” the wick. Once the soil is damp, the capillary action will take over.
Maintenance and Troubleshooting for Your Herb Garden
Even a “set-and-forget” system needs a check-up now and then. The most common mistake beginners make is assuming “self-watering” means “never-watering.”
| Feature | DIY Bottle System | Commercial Planter (Premium Models) |
|---|---|---|
| Cost | Near zero (recycled) | $30 – $150+ |
| Water Capacity | Small (refill every 5-7 days) | Large (refill every 2-3 weeks) |
| Durability | Temporary/Seasonal | Years (UV-protected) |
| Aesthetics | Fun/Crafty | Sleek/Modern |
| Indicators | Visual (clear plastic) | Mechanical float or “tilt” gauge |
Refill Frequency and Monitoring
How long the water lasts depends on your environment. In a sunny window, 3 inches of water in a DIY reservoir might last almost two weeks. However, in the height of summer, your plants might drink that in five days. Always keep an eye on the water level; if the wick goes dry, the “connection” is broken, and you’ll need to top-water again to restart the flow.
Avoiding Common Pitfalls
To keep your herbs in “mint condition,” watch out for these issues:
- Algae Growth: If you use clear bottles, sunlight will hit the water and grow green algae. You can prevent this by painting the bottom reservoir or wrapping it in decorative paper.
- Root Rot: If the soil stays too saturated, the roots can’t breathe. If your plant looks wilted despite wet soil, pull back on the water level.
- Cleaning: Every few months, empty the reservoir and wash it with mild soap to prevent bacterial buildup.
For more detailed advice on keeping your plants healthy, browse our guide on indoor-herb-watering-mistakes-to-avoid and consider using compact-watering-tools-for-herb-gardens for precise refills.
Optimizing Light and Nutrients for Self Watering Herbs
Since your herbs are growing faster than they would in a dry pot, they need fuel.
- Lighting: If you don’t have a south-facing window, consider a full-spectrum LED grow light. Many modern systems come with built-in lights that adjust in height as the plant grows.
- Feeding: Use a water-soluble, organic liquid fertilizer. You can add this directly to the reservoir water at half-strength. This ensures a steady “IV drip” of nutrients to the roots. Check out our indoor-herb-fertilizer-guide for specific brand recommendations and schedules.
Frequently Asked Questions about Self-Watering Systems
How long does the water last in the reservoir?
In most indoor settings, a standard reservoir will last between 7 and 14 days. This makes self watering herbs the perfect solution for travelers. If you’re going on a two-week vacation, just top off the reservoir before you leave! Factors like humidity, the size of the plant, and the amount of sunlight will affect “thirst levels.”
Can I use these planters outdoors in small urban spaces?
Absolutely! Many commercial options are designed specifically for balconies and decks. Look for “UV-protected” or “heavy-duty” materials like those found in professional-grade commercial models. These modular designs allow you to create a “vertical forest” even if you only have a few square feet of concrete.
What are the most common mistakes to avoid?
- Using the wrong soil: Never use heavy garden soil; it will compact and stop the wicking process. Always use a light, airy potting mix.
- Ignoring the wick: If you use a synthetic string (like nylon), it won’t absorb water. Stick to 100% cotton or specialized microfiber.
- Overfilling: Don’t submerge the soil completely in the water. There should be a “gap” of air between the water surface and the bottom of the soil container.
For more on getting the dirt right, see our updated guide on soil-and-fertilizer-for-indoor-herbs-2.
Conclusion
Growing your own self watering herbs is one of the most rewarding steps you can take toward a sustainable, flavor-filled lifestyle. Not only do you save money at the grocery store, but you also eliminate the plastic waste of those store-bought herb clamshells.
Whether you choose to upcycle a soda bottle or invest in a sleek professional system, the result is the same: fresh, pesticide-free produce at your fingertips. At FinCapitaly, we believe that urban self-sufficiency starts with these small, smart choices.
Ready to turn your windowsill into a culinary oasis? Start your herb garden journey today and enjoy the taste of success, one leaf at a time!
